


In this guide, we’ll show you exactly how to use the SMOK G-Priv 4, what all of its main settings do, and how to set it up like a PRO…
Table of Contents
The SMOK G-Priv 4 features adjustable wattage, temperature control, and power mode settings which means you can basically customize how it outputs until your heart’s content.
With its large OLED display and intuitive menu system, it’s easy to get started with the SMOK G-Priv 4 Vape Mod. But if you’re brand new to vape mods, it might seem a little confusing at first.
Getting Started With The SMOK G-Priv 4 Vape Mod
That’s why we’ve put together this guide to help you understand the basics of using your G-Priv 4 Vape Mod so you can get the most out of it.
To start, make sure your device is powered on by pressing the firing button five times quickly.
Next, press the up/down adjustment buttons to navigate through the display menu system. Here you can adjust the wattage, temperature control and power mode settings to customize your vaping experience.
To get started, all you need to do is set the wattage; we’ll cover the more advanced stuff later.
If you’re using a sub-ohm tank, start off nice and low – around 50W, depending on your tank’s coil resistance – and then work your way up, in 10 or 5W increments, until you find your ideal vaping level.
How To Use The SMOK G-Priv 4

Almost all of SMOK’s recent run of mods utilize a fire bar over a single fire button. This is a great method for firing your mod, as it requires very little precision, you can do it blindly, and the overall motion is more intuitive.
Once you’ve unboxed your SMOK mod, and you have installed the correct batteries in the right orientation, simply click the fire bar FIVE times to wake the mod. There will be a short boot-up time, where you see the SMOK logo, and then, once all the software is booted, the settings menu will appear on the display.
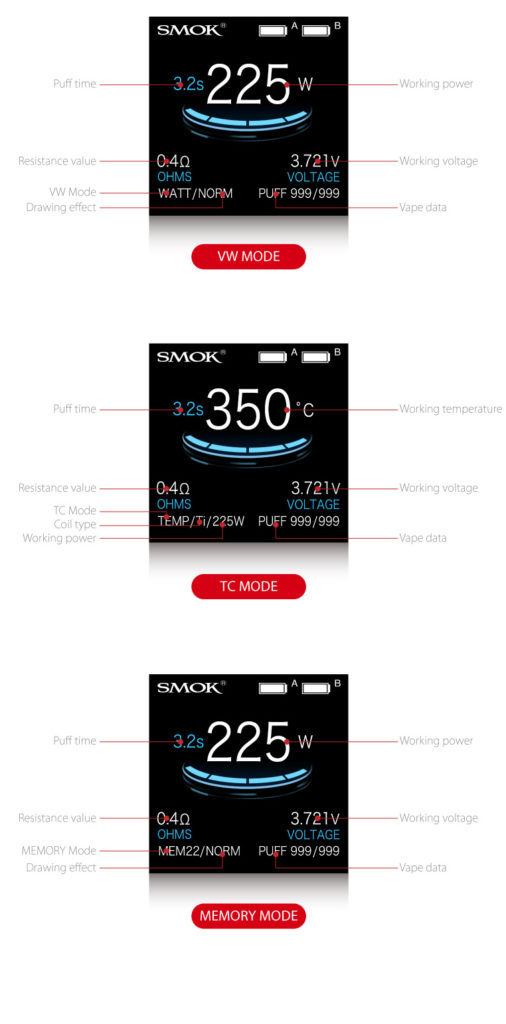
How To Use SMOK Mods: Exploring The Display
SMOK packs a lot of information into its mods’ displays. You have wattage and TC readings, dual-battery readouts, Ohms reading, voltage, and even a puff counter so you can see how much you’re vaping each day.
If you’re using one of SMOK’s sub-ohm tanks, you need to make sure that its resistance matches what the coil says on the side. You shouldn’t have any issues with this, as they’re all calibrated for the purpose.
Atomizer Error
You can run into issues with your SMOK mod if the coil isn’t set up correctly, though this specific issue mostly affects homemade coils.
The resistance of the coil, once installed, is shown with the Ohms symbol (Ω) – 0.18Ω, for instance. If you’re using homemade coils, the resistance of the coil may differ, but that’s a whole other kettle of fish.
If there are any issues and/or problems with the coil, its resistance, or the connection, the mod will simply not fire and likely show an error message.
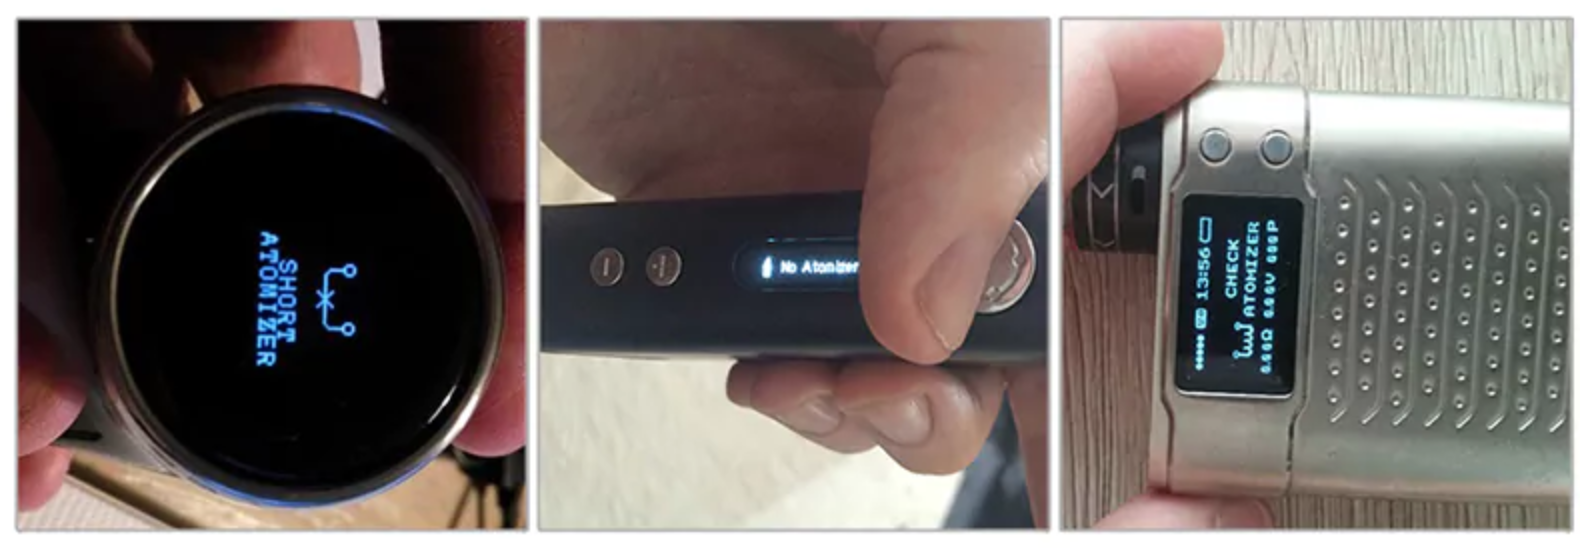
If this happens, check your coil, make sure it’s connected properly, and ensure the tank is attached properly.
To set the desired wattage (or power), simply toggle the buttons up and down until you find the sweet spot for your tank.
Please note: it is ALWAYS best to start way lower (40-50W) than the advertised power and work your way up slowly, as this gives the coil a chance to prime properly.
Firing the mod at too high a power mode with a new coil can burn it out, and this will cost you A LOT of money in the long run. Go slow and steady.
How To Access Settings
- If you’re using a touchscreen SMOK mod, there will be a settings icon on the home screen which you can simply tap to access the mod’s settings.
- If you’re using a non-touch device, just click the fire key THREE times to enter the Settings Menu.
- Once inside Settings, you can move through the menus using the UP and DOWN keys on the mod. The first setting you will encounter is the MODE SETTING.
In MODE SETTING, you can set up different vaping modes for different types of coil – W, Ti, Ni, SS, M – as well as adjust pre-heat, if you’d like to have this feature up and running.
If you’re just wanting to vape, and aren’t bothered about doing anything fancy, just stick the mod in W (wattage) mode and adjust the wattage accordingly.
Ti, Ni, and SS are there for different types of coils and Temperature Control vaping; you can make/use coils from titanium, nickel, and stainless steel, and these all require proprietary settings to run optimally.
If you’re just running the SMOK coil that came with the kit, just stick to wattage mode, as that is designed for standard power modes.
The only time you need to worry about the other settings is if you’re TC vaping or making your own coils with different types of wire.
Moving Around Inside The Menus

When you enter the settings menu (THREE CLICKS on the fire bar), you can quickly skip through the settings menus by clicking the fire bar.
SMOK mods have FOUR main menus:
- Mode Setting – where you select your vaping mode (TC or wattage, for instance)
- Puff Counter – you can limit the number of puffs you take per day; this feature is set to NEVER as default
- Screen Setting – in here you can (on some mods) change the color of the font as well as the light-up LEDs on mods like the ProCOLOR
- Power Off – this is where you turn the mod off
Once you’re inside a Menu sub-folder, to move around simply use the buttons that you use to adjust the temperature.
To select a setting, hold down the fire key for ONE SECOND.
EXAMPLE: How To Change The Font Color On A SMOK Mod
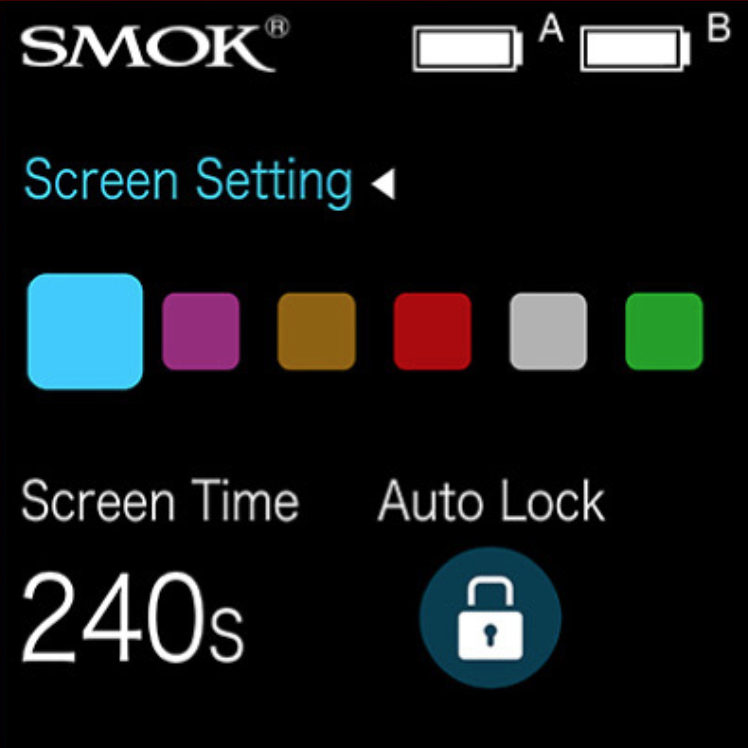
- From the Home screen, Click THREE times on the fire bar
- Click through the menus until you reach Screen Setting
- Use the buttons on the mod to move through the options until you find the color you want
- Once you have the color you want, hold the fire bar for ONE SECOND
- Done
This process works across the entirety of the operating system: ONE SECOND holds select options; quick clicks move you through the Settings Menu; the physical buttons are used to move through the Menu’s sub-folders and options.
Installing A New Coil
When you change the coil on your tank, especially if you’re using an RDA, the SMOK mod will ask you if it is a NEW or OLD coil and give you two potential Ohms readings.
Select the one that is the same as your coil – if it’s new, basically, just hit the NEW option.
On a touchscreen SMOK mod, simply tap the NEW option. If you’re using a non-touchscreen SMOK mod, toggle between the options using quick clicks on the fire bar, and when you have the right option selected LONG PRESS the fire bar to select it.
Quick Settings To Remember
- Quickly Switch Between SOFT, NORMAL, HARD, MAX: on a non-touchscreen SMOK mod, simply press the fire bar and the up button at the same time. From here, you can then cycle through the output settings.
- How To Change Wattage In TC Mode: press the fire bar and the up button at the same time. Now adjust the wattage power using the up and down keys until you find your sweet spot. Once you’ve got what you want, press and hold the fire bar for a couple of seconds to lock it in.
- How To Lock/Unlock Device: on a touchscreen SMOK mod, fire the fire bar THREE times to lock the mod; another THREE clicks will unlock it. On a non-touchscreen SMOK mod, simply hold the two navigation buttons down together at the same time to lock, and another time to unlock.
How To Upgrade SMOK Mod’s Firmware
First and foremost, make sure you have SMOK’s NuMicro ISP Programming Tool installed on your PC.
Once this is installed, you need to follow the steps on how to upgrade the firmware on SMOK’s official website.
You’ll also want to make sure you’re using the best possible vape tank and the best quality vape juice in order to get maximum performance from your SMOK G-Priv 4 vape mod.